I know of no other 4-6-mile loop that delivers such variety and challenge as this Pink Goblin Loop. Prepare to traverse three wild canyons, experience some light bouldering challenges, ascend a huge hill and take in big spectacular scenes. And all this is just a few miles from metropolitan Las Vegas!
Beginning at the Kraft Mountain trailhead in Nevada’s beautiful Calico Basin you’ll ascend “Hell Hill” to the summit of the Pink Goblin Pass. From there, descend to Gateway Canyon. After navigating a few easy polished limestone dry falls in Gateway Canyon take a left to ascend a gully I call “Rattlesnake Gulch“, navigating a few additional beautiful but easy limestone dry falls. Near the summit of Rattlesnake Gulch you’ll connect with the upper Rattlesnake Trail.
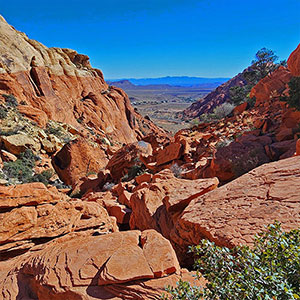
At the summit of Rattlesnake Gulch, take a left into the upper opening of Ash Canyon on the Ash Canyon Trail. Traverse a variety of artistically sculpted sandstone formations along with some light bouldering and trail finding as you descend beautiful, wild Ash Canyon. You’ll experience spectacular views down the entire length of Ash Canyon to the Calico Basin below and distant points beyond. You might even see rock climbers scaling the impossibly high, vertical cliffs above. Finally, emerge from the lower opening of Ash Canyon for a short, easy walk back to your starting point at the Kraft Mountain trailhead.
This entire experience requires no more than some light class 3 (need to use both hands and feet) rock scrambling in a few places along with picking out the best route during a few times when the trail disappears. However, all along the way there are large reference points to guide you. In all, this is a great introductory experience to wilderness navigation is the Southwest U.S. In addition, this is a full body workout. But again, it’s nothing extreme.
Here are a few of the spectacular reference points you will see along the way:
Stick to the Fall through Spring months. Summer temperatures can reach the upper 90s and beyond. Make sure the last rain was over 24 hours ago as the sandstone in Ash Canyon gets very slick when wet. Definitely avoid snow or icy conditions!
From Hwy 215 in the Summerlin area, take the Charleston Blvd exit, turn upward (West) on Charleston Blvd toward the mountains. Charleston Blvd becomes Blue Diamond Rd. (159) as you leave the city. Take the Calico Basin exit off 159 (right turn) onto Calico Basin Road. Continue on Calico Basin Road to the end of the road. On the way you will pass the Red Springs Desert Oasis parking area as the road veers right and becomes Calico Drive, then Sandstone Drive. Sandstone Drive ends with the Kraft Mountain parking lot, on the left.
Get your bearings at the Kraft Mountain Trailhead where you can see the entire Pink Goblin Loop route. The route basically circles the large hill to the left (West) of Kraft Mountain.
From the trailhead you can see a saddle pass between Kraft Mountain and the large hill just to the left. That saddle is the summit of Pink Goblin Pass. Further to the left, just to the left of the large hill is another saddle. That saddle is the upper opening of Ash Canyon. You’ll be ascending through Pink Goblin Pass, then descending the far side of Pink Goblin Pass to take a left around the back side of the large hill. You’ll emerge at the saddle on the left side of the large hill, descend the canyon there (Ash Canyon) and return to your starting point at the Kraft Mountain trailhead.
So, the route is pretty simple. However, keep the big picture in mind: That large hill you’ll be circling. When the trail disappears a few times along the way, just keep circling the large hill to the left (West) of Kraft Mountain. The trail will periodically reappear and you’ll stay on track!
You’re beginning on the Kraft Mountain Loop trail as if you’re taking the loop in a clockwise direction around Kraft Mountain. Follow the signs for the Kraft Mountain Loop until you reach the summit of Pink Goblin Pass. The trail is well defined and the ascent to the pass is called “Hell Hill“. The hill is not that bad but the name if fun. You can say, “I survived Hell Hill“! As you’re ascending Hell Hill, that huge sandstone formation to your right is the Pink Goblin. Yes, like seeing shapes in clouds, you have to work at it…but eventually you’ll figure out the shape of a goblin…gargoyle…something scary!
Turn around often on the way up Hell Hill to see expanding views of the Calico Basin and beyond, along with beautiful calico sandstone formations to your right along Kraft Mountain.
At Pink Goblin Pass, the summit of Hell Hill, expansive views open up ahead. There’s Turtlehead Peak straight ahead with a backdrop of the La Madre Mountains ridgeline, Gateway Canyon below slightly to the right, and a huge sandstone ridgeline to the right (East) of Kraft Mountain. That ridgeline is much larger than Kraft Mountain!
As you begin descending the far side of Pink Goblin Pass, take time to notice the incredibly beautiful sandstone sculptures to your right! About mid-way to the base of Gateway Canyon there’s an unmarked trail split to the right. Look closely or you could miss it. That’s the continuation of the Kraft Mountain Loop around Kraft Mountain. You won’t take it today, but it’s good to know where it is. You’re continuing straight as you leave the Kraft Mountain Loop.
As you continue to descend, the wide limestone gravel wash at the base of Gateway Canyon appears. Now watch carefully as you approach the wash. There are two very faint unmarked trail splits to your left. These are a streamlined connection, actually the beginning of the Rattlesnake Trail that will take you around the back side of the large hill to the left (West) of Kraft Mountain and on up to the opening of Ash Canyon.
On this day (and in the video on this page) I took an interesting, slightly more challenging variation of the route by continuing down to the Gateway Canyon Wash and taking a left to begin ascending that wash. It turned out to be a slightly wider loop, but still, basically the same Pink Goblin Loop.
As you ascend the beautiful Gateway Canyon Wash, the wash begins to narrow. Artistic limestone channels appear, carved out by the prior action of water rushing through the canyon. There are a few low, slightly challenging, interesting dry falls to ascend. Keep your sights on a large hill ahead and to the left. As you near that hill, you’ll find a gully branching off to the left along the base of the hill. I call that gully “Rattlesnake Gulch” and it will eventually connect with the upper portion of the Rattlesnake Trail near the upper opening of Ash Canyon.
Rattlesnake Gulch is narrow and there are a few shallow artistic dry falls along to way to add some interest. Eventually you’ll see a line of calico sandstone cliffs ahead. That line of cliffs marks the place where you’ll turn left to enter Ash Canyon. As you approach those cliffs two things will happen: Rattlesnake Gulch will become clogged with brush ahead and there will be a left-splitting trail leading you out of the gulch. In around 100 feet that trail connects with the Rattlesnake Trail!
About 500-1,000 feet later, the Rattlesnake Trail intersects with the unmarked left-splitting Ash Canyon Trail, the surface of which is red from the surrounding Aztec red sandstone. Soon the Ash Canyon trail begins passing through beautiful Aztec red sandstone sculpted pillars and shapes dotted with bonsai-like pines, desert holly, yucca, cacti and other plants. It’s like the garden we all try to create, only bigger, more beautiful and totally natural!
In a bit you’ll emerge from this Aztec red sandstone bonsai garden area to see a white sandstone hill ahead. This hill marks the end of what I refer to as Upper Ash Canyon. Through upper Ash Canyon you’ve been on the nicely defined Ash Canyon Trail. You can circle to the right of the white sandstone hill. This, I believe, is the continuation of the trail. In the video I circled to the left of the hill. Same result, but the left route is a bit steeper with a light class 3 rock scrambling descent on the other side of the hill. Both routes work. One advantage of the steeper left route is that is gives a higher, larger perspective of mid and lower Ash Canyon below and makes it possible to create your overall Ash Canyon navigation strategy.
From the high perspective on the white sandstone hill I created an Ash Canyon strategy that involved keeping to the upper right (West) side of the canyon below as long as possible in order to avoid the brush, boulders and ledges in the base of the canyon. You’ll see this route in the video on this page. Here’s the thing: You WILL lose the trail a number of times as you descend Ash Canyon. In fact, the trail will disappear! Not to worry. Stick to your overall Ash Canyon strategy and the trail will conveniently reappear at times. You actually don’t need the trail.
After descending to the base of the white sandstone hill, I crossed over to the right (West) side of Ash Canyon and stayed high along the red sandstone at the base of the cliffs. There was actually a faint trail up there, but there are faint occasional trails everywhere in Ash Canyon! Staying high did indeed help me bypass a stretch of boulders, brush and ledges at the base of the canyon. However, there came a point where the upper route gave out, making it necessary to descend to the base of the canyon. Huge boulders…even a short tunnel down there.
The fortunate thing is that whenever I reached a ledge, there was a brief bypass trail to the left above the wash. The remainder of the trip was basically a walk, though on brief, steep loose rock bypass stretches in places. It was just a matter of weaving around all obstacles. Interesting, challenging, beautiful! Just know that you do not need to do any heroic vertical ledge climbing. If you find yourself facing a vertical barrier, just look around to the right or left (mostly the left) for a walking route around the barrier.
As you descend mid and lower Ash Canyon, notice a low flat ridge below the lower opening of the canyon on the left. You’ll even see a trail along that ridge. As you approach that lower canyon opening and ridge, a trail will appear that easily leads you above the canyon wash and up onto that ridge. Once on the ridge above the canyon you’ll see the Kraft Mountain trailhead ahead to the left. A nice trail will take you back to your starting point at the Kraft Mountain Trailhead!
Congratulations! You’ve completed the fascinating, challenging Pink Goblin Loop! It’s quite an achievement and in the process you’ve created life memories during this blessed wilderness immersion!


Return often to experience one new adventure each week! From the home page scroll to “Most Recent Adventures“. More about David Smith…
The trail adventures on this website require proper conditioning, preparation and safety precautions. There are many factors beyond our control including weather conditions, unstable ground, loose rocks, insects and snakes, people you may encounter, your own level of physical conditioning, the potential of getting lost just to mention a few. While this site offers guidance, helpful tips, direction and training, the reader assumes full responsibility for whatever may occur during their trail adventure. Have fun and be safe!