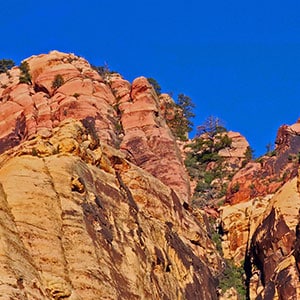
Juniper Peak Summit | Rainbow Mountain Wilderness, Nevada
Summit Adventure
Initial Exploration from Oak Creek Area
I was very new to Nevada at this time and errors in the video below probably reflect this. Missed the summit approach and ended up ascending a steep rock climber’s gully. However, there is the experience of the fresh, new discovery of someone recently arrived from Connecticut!
Overview | Juniper Peak Summit | Rainbow Mountain Wilderness & Red Rock Canyon, Nevada
Popularity of Juniper Peak
Why is Juniper Peak is one of the most popular climbing destinations in Red Rock Canyon and in The Rainbow Mountains?
- Easy access right off The Red Rock Canyon Scenic Drive
- Opportunity to experience the fun challenge of one of the canyons on the Eastern Base of the Rainbow Mountains
- Summit one of those spectacular Aztec red rock peaks in the Rainbow Mountains.
- No need for advanced rock climbing experience or equipment (The entire route is class 2 and light class 3 scrambling)
- The trip to the summit and back takes about a half day (4-6 hours)
Challenges of Juniper Peak
- Locating Juniper Canyon’s Entrance: The Juniper Canyon approach trail can be a confusing network of unmarked “rabbit” trails splitting off in all directions. This is in part due to numerous unmarked rock climbing approach routes splitting off to the North and South.
- Navigating Juniper Canyon: Here you’ll face the brush, boulders and ledges typical of canyons along the Eastern base of The Rainbow Mountains. Though there are a number of helpful cairns to guide the way, cairns can disappear and are not 100% present when you need to know where to turn next. My own experience is that it’s possible to head off route and end up retracing your way numerous times to the correct route even after having navigated Juniper Canyon successfully more than once previously!
- Braving Some Significant Exposure: Though you can make the summit without exceeding a class 3 level of climbing, there are a few stretches along the summit approach above Juniper Canyon that run along steep drop-offs.
Given these challenges, it might be wise to navigate Juniper Peak your first time with some rock climbing experience, a climbing partner, specific route directions and a good pair of rock climbing shoes. Or, you can take my approach and make multiple attempts going a bit further each time until you reach the summit!
Two Stages to This Adventure
Due to the two uniquely different terrains, I’ve devoted a page for each stage:
- Locating and Navigating Juniper Canyon
- Juniper Peak Final Summit Approach (this page)
Spectacular Views Along the Way and From the Summit
Along the way as you’re heading toward Juniper Canyon and its narrow opening expect spectacular views of Red Rock Canyon and its surroundings including:
- The Rainbow Mountains
- White Rock Mountain
- The La Madre Mountains Ridgeline
- Turtlehead Peak
- Damsel Peak
- The Calico Hills
- Glimpses of The Las Vegas Valley and Blue Diamond Hill
From the summit, expect to see all this and much more!
Best Time of Year to Summit Juniper Peak
Stick to mid Fall or mid Spring on a clear day. Rain within 24 hours previously can make the rock surfaces you will need to navigate rather treacherous; and Winter months may bring snow and ice which is also dangerous. Summer months can bring temperatures in excess of 110 degrees! During the Summer, do yourself a favor and head for the higher, cooler elevations of The Mt. Charleston Wilderness.
Directions to the Trailhead | Juniper Peak Summit | Rainbow Mountain Wilderness & Red Rock Canyon, Nevada
Juniper Peak – 3 Trailheads in Red Rock Canyon
There are 3 trailheads in Red Rock Canyon that are closest to Juniper Peak:
- Parking at the Red Rock Canyon Scenic Drive Exit: This is the trailhead used in this summit adventure. Avoid park fees and the need for advanced registration.
- Pine Creek Canyon Trailhead, the second to the last turn-off on the Red Rock Canyon Scenic Drive Loop.
- Oak Creek Canyon Trailhead the last turn-off on the Red Rock Canyon Scenic Drive Loop.
Juniper Peak Via the Oak Creek Canyon Trailhead
My favorite approach to Juniper Peak is via The Oak Creek Canyon Trailhead and The Arnight Trail. It seems more direct, and the return trip when you’re tired at the end of the Juniper Peak adventure is downhill all the way! In addition, The Oak Creek Canyon Trailhead is not as crowded as The Pine Creek Canyon Trailhead. There are semi-primitive restroom facilities at both trailheads:
- Oak Creek Canyon Trailhead: A half-mile up the unpaved Oak Creek Canyon Road.
- Arnight Trailhead: A 1.2-mile trail that skirts along the base of the Rainbow Mountains between Oak Creek Canyon and Juniper Canyon.
Narrative Guide | Juniper Peak Summit | Rainbow Mountain Wilderness & Red Rock Canyon, Nevada
Getting Your Initial Bearings
For today’s summit adventure, we started at the Red Rock Canyon Scenic Drive exit parking area. At the parking area, begin by identifying Rainbow Mountain, the tall pointed peak and Juniper Peak, the shorter peak to the right of Rainbow Mountain. Now, look closely at Juniper Peak. From the bottom up, here are the important points you can identify before even starting your adventure:
- Oak Creek Canyon Trailhead: Look carefully to make out a small building and parking area below the left (South) side of Rainbow Mountain
- Juniper Canyon: The canyon between Rainbow Mountain and Juniper Peak
- Boulder Field near the summit of Juniper Canyon, above the canyon and to the right (North)
- Brownstone Wall: The long reddish cliff face just below Juniper Peak, stretching from the boulder field to Juniper Peak summit.
- Light Sandstone Slab: That massive sandstone slab running along the base of Brownstone Wall.
- Final Summit Approach: The ascent gully on the right side of Juniper Peak summit.
From the place you parked your car, you’ve just identified your entire route to Juniper Peak summit!
- You’re going to head on a nice trail to the Oak Creek Canyon Trailhead.
- From there, take the Arnight Trail to the base of Juniper Canyon.
- Ascend Juniper Canyon along its right (North) edge.
- Ascend the Boulder Field to the Sandstone Slab below Brownstone Wall
- Skirt the base of Brownstone Wall on the Sandstone Slab
- Round the North edge of Brownstone Wall, ascending the Summit Approach Gully to Juniper Peak Summit!
All that is left is to actually navigate this route! Here’s what you can expect. There are definitely some challenging complications at many points along the way.
Scenic Drive Exit Parking Area to the Base of Juniper Canyon
This initial stretch is the easiest stretch of the day, and on the return trip the nice trails will be a welcome relief. When you reach the Oak Creek Canyon Trailhead, see a distinctive sign to the right (North) side of the trailhead indicating The Arnight Trail. Take the Arnight Trail to the base of Juniper Canyon. Here is your first slightly complicated move. At the base of Juniper Canyon, before crossing the canyon as the Arnight Trail ends, converging with the Knoll Trail, continue to cross Juniper Canyon on the Knoll Trail. Once you’re crossed the base of Juniper Canyon, look carefully to take the first left, a slight trail heading along the upper right (North) side of Juniper Canyon.
Lower Base of Juniper Canyon Wash to the Canyon Opening
This next part is very important and can mean the difference between some fun bouldering up Juniper Canyon and getting bogged down in the thick wall of brush in the canyon. Continue on the faint trail all the way to the mouth of Juniper Canyon. Eventually, that trail will dive down into the canyon wash, but AVOID THE INITIAL TRAILS LEADING DOWN INTO THE CANYON WASH! Yes, as you near the canyon opening, there are some inviting trails leading downward. Pass these and only descend into the wash at the very last opportunity…which is further than you might expect.
Navigating Through Juniper Canyon to the Upper Boulder Field
Descend into the canyon wash at the last opportunity. Once you’ve landed in the canyon wash, look carefully at the boulders on the right to see a small cairn (hope it’s there on the day of your adventure) at the top of a boulder. Ascend that boulder, you’re first bouldering move in Juniper Canyon. Many will follow. Watch for cairns ahead as you continue up the canyon. Generally, you want to navigate near the right (North) side of the canyon, but you’ll be weaving through and up and over large boulders as the canyon progressively ascends from one level to the next. Curiously, you will be surprised how steep the canyon is when you look down on it from above. But while you’re navigating through the boulders in the canyon wash, you don’t realize how rapidly you’re ascending.
After some time and distance, you’ll see a reddish, roundish ridgeline on the upper left side of Juniper Canyon. Look for a trail on the left, ascending up and over the ridge, eventually to descend again into the canyon wash above. Let’s call this the Upper Bypass Trail. Don’t miss that trail! It bypasses a lot of pain and suffering in the brush and boulders below! Also, from the highest point on the Upper Bypass Ridge you can now see the Upper Boulder Field ahead, across the canyon. It’s on the right (North) side of the canyon, ascending toward the Sandstone Slab along the base of Brownstone Wall. These are you next targets.
The Upper Bypass Trail descends again into the canyon and continues for around 200 feet. Now, watch for a faint trail splitting off to the right and crossing over to the Upper Boulder Field on the North side of the canyon.
Upper Boulder Field to the Sandstone Slab
There is actually a faint pathway angling upward diagonally to the left from the base of the Boulder Field to where it meets the Sandstone Slab. Follow that diagonal ascent. There may be a few cairns along the way to guide you.
Navigating the Sandstone Slab
You want to navigate upward on the Sandstone Slab, angling toward the base of Brownstone Wall. There are some cairns along the way. You won’t fail to notice the rounded right side of the slab is a steep, yawning drop-off. Staying away from the yawning drop-off to the right, along with having climbers boots with good sticky Vibram soles will be very helpful. Avoid stepping on any wet sandstone as you continue angling upward toward the base of Brownstone Wall. Be careful and take it step by step! Note that you’re not heading straight up to the base of Brownstone Wall, but angling upward to eventually reach the base of the wall somewhere near its half-way point.
Base of Brownstone Wall to the Final Summit Approach
Notice a reddish rocky mound at the upper end of Brownstone Wall. This is your next target. As you continue ascending the Sandstone Slab closing in on reaching the base of Brownstone Wall, a trail will appear. This trail, along with a few cairns, will guide you all the way to the upper end of Brownstone Wall where you will reach the reddish rocky mound. There, you will see to your left, the final summit approach gully.
Final Summit Approach Gully to the Rabbit Hole
There are a couple ways to ascend the Final Summit Approach Gully. One is to stay on the trail, but this can be a bit confusing in places as it winds upward through the gully. Another approach is to ascend, hugging the base of Brownstone Wall. This baseline route is not confusing, but does require a bit more rock scrambling. Pick your poison! Either way, eventually, at the gully summit, you’ll ascend through a Rabbit Hole. There is a near vertical 8-10ft ascent at the top of the rabbit hole. Fortunately, you can wedge yourself through the upper opening finding hand and foot holds to aid the ascent. It might be good to have a spotter below, especially if you’re not used to making this kind of move. It’s not as hard as it looks at first, but it definitely commands your full, careful attention.
Rabbit Hole to the Summit
Once above the Rabbit Hole, there’s a kind of pathway that will help guide you the remainder of the way as you spiral upward, eventually summiting on the West (Back) side of the summit. There’s a bit of rock scrambling, but by now, after what you’ve experienced along the way to this point, it’s like taking a victory lap at the end of a race! Before you know it, you’re standing on Juniper Peak Summit!
What Can You See from Juniper Peak Summit?
See if you can identify the following reference points. We’ll go clockwise:
- You’re entire approach route through Juniper Canyon, all the way to where your car is parked at the Red Rock Canyon Scenic Drive exit.
- Blue Diamond Hill across highway 159 where your car is parked.
- Rainbow Wall on the North side of Rainbow Mountain.
- The Rainbow Mountain Upper Crest Ridgeline above to the West.
- North Sandstone Peak & Buffalo Wall.
- The Wilson Ridgeline beyond, in the distance to the Northwest.
- The South side of Bridge Mountain, including its summit approach.
- The La Madre Ridgeline
- Damsel Peak on the far side of the Brownstone Basin
- Gray Cap Ridgeline with the Calico Hills in the foreground.
- The Las Vegas Valley and Strip
Returning to Your Starting Point
The return is simple, just retrace your approach route all the way back to the starting point!
Summary
Congratulations! You’ve just summited what is arguably the most popular sandstone peak in the Rainbow Mountains! The challenges you experienced along the way are a good introduction to the terrain you’ll experience on the other peaks. Two other peaks that provide a great introduction to summiting sandstone peaks are:
These are actually a bit easier than Juniper Peak! The other peaks in the Rainbow Mountains are more difficult.